There is a particular kind of disappointment that everyone has felt. The plate in front of you is beautiful — the colour, the steam, the small perfect arrangement of it — and you lift your phone, take the photo, and look down at something flat, yellow, and slightly sad. The food was lovely. The picture is not. Food photography is one of the most common things people attempt and one of the most quietly difficult to do well, because a dish that delights all your senses in person has to be reduced to a single flat frame that can only use one of them. Getting it right is less about equipment and more about a handful of decisions, made in the right order, with restraint. Here is how to make a meal look as good as it tastes.
Light is the whole game
If you take only one thing from this, take this: the single biggest difference between an appetising food photo and a depressing one is light, and specifically natural light. The warm overhead bulbs in most homes and restaurants are the enemy of food. They cast a sickly yellow tint, throw harsh shadows down onto the plate, and flatten everything they touch. The on-camera flash is worse — it bleaches the food, kills the texture, and produces that unmistakable look of a meal photographed in an interrogation room.
The fix is almost embarrassingly simple: find a window. Soft, indirect daylight is the most flattering light there is for food, because it reveals texture and renders colour honestly without harshness. Position the plate near a window, ideally with the light coming from the side or slightly behind the dish rather than straight on, so that it rakes across the surface and brings out the gloss of a sauce, the crumb of a pastry, the condensation on a cold drink. If the daylight is too harsh, soften it further with a sheer curtain. This one move — turning off the indoor lights and using a window — will improve your food photos more than any other single thing.
Choose the angle the dish is asking for
The second decision is the angle, and the mistake is using the same one for everything. Different foods want to be seen differently, and the dish itself usually tells you how. The flat overhead shot, looking straight down, is perfect for things that are best read as a composition on the plate — a spread of dishes on a table, a bowl of soup, a pizza, anything where the arrangement is the point. The straight-on, eye-level shot is for food with height and layers that you want to celebrate: a tall burger, a stack of pancakes, a glass of something layered, a slice of cake where the cross-section is the star.
Between those two sits the most reliable angle of all, the three-quarter view at roughly forty-five degrees, which is close to how the food looks to you when you are sitting in front of it about to eat it. It gives a natural sense of depth and is the safe, flattering default for most plated meals. When in doubt, start there, then ask what the food is showing off — its surface, its height, or its arrangement — and adjust.
Style with restraint
Good food styling is mostly about removing things, not adding them. The instinct is to fill the frame with props — cutlery, napkins, ingredients, flowers — and the result is usually clutter that competes with the food. The dish is the hero; everything else is a supporting actor that should know its place. A clean, neutral surface with some texture, like wood or stone or simple linen, gives the food room to breathe. One or two considered elements — a fork resting at the edge, a scatter of the key ingredient, a glass just out of focus behind — suggest a scene without crowding it.
The food itself benefits from small attentions. A garnish placed deliberately, a wipe of the plate's rim where the sauce smudged, a few crumbs left artfully rather than swept away to imply that this is real food about to be eaten. And freshness photographs as freshness: herbs wilt, ice cream melts, steam vanishes, and a crisp dish goes soft within minutes. Which leads to the most important practical rule of all.
Shoot first, and shoot fast
Food has a window, and it is short. The moment a plate arrives is its most beautiful moment, and it begins decaying immediately — the gloss dulls, the colours fade, the steam disappears, the bright green herb darkens. The photographers who get the great shot are simply the ones who are ready before the food arrives, who have thought about their light and their angle in advance, and who take the picture in the first thirty seconds rather than after rearranging props for five minutes. Decide your setup before the plate lands. Then shoot quickly, take a few frames at slightly different angles, and put the phone down and eat. A photo of food at its peak beats a perfectly styled photo of food that has gone tired every time.
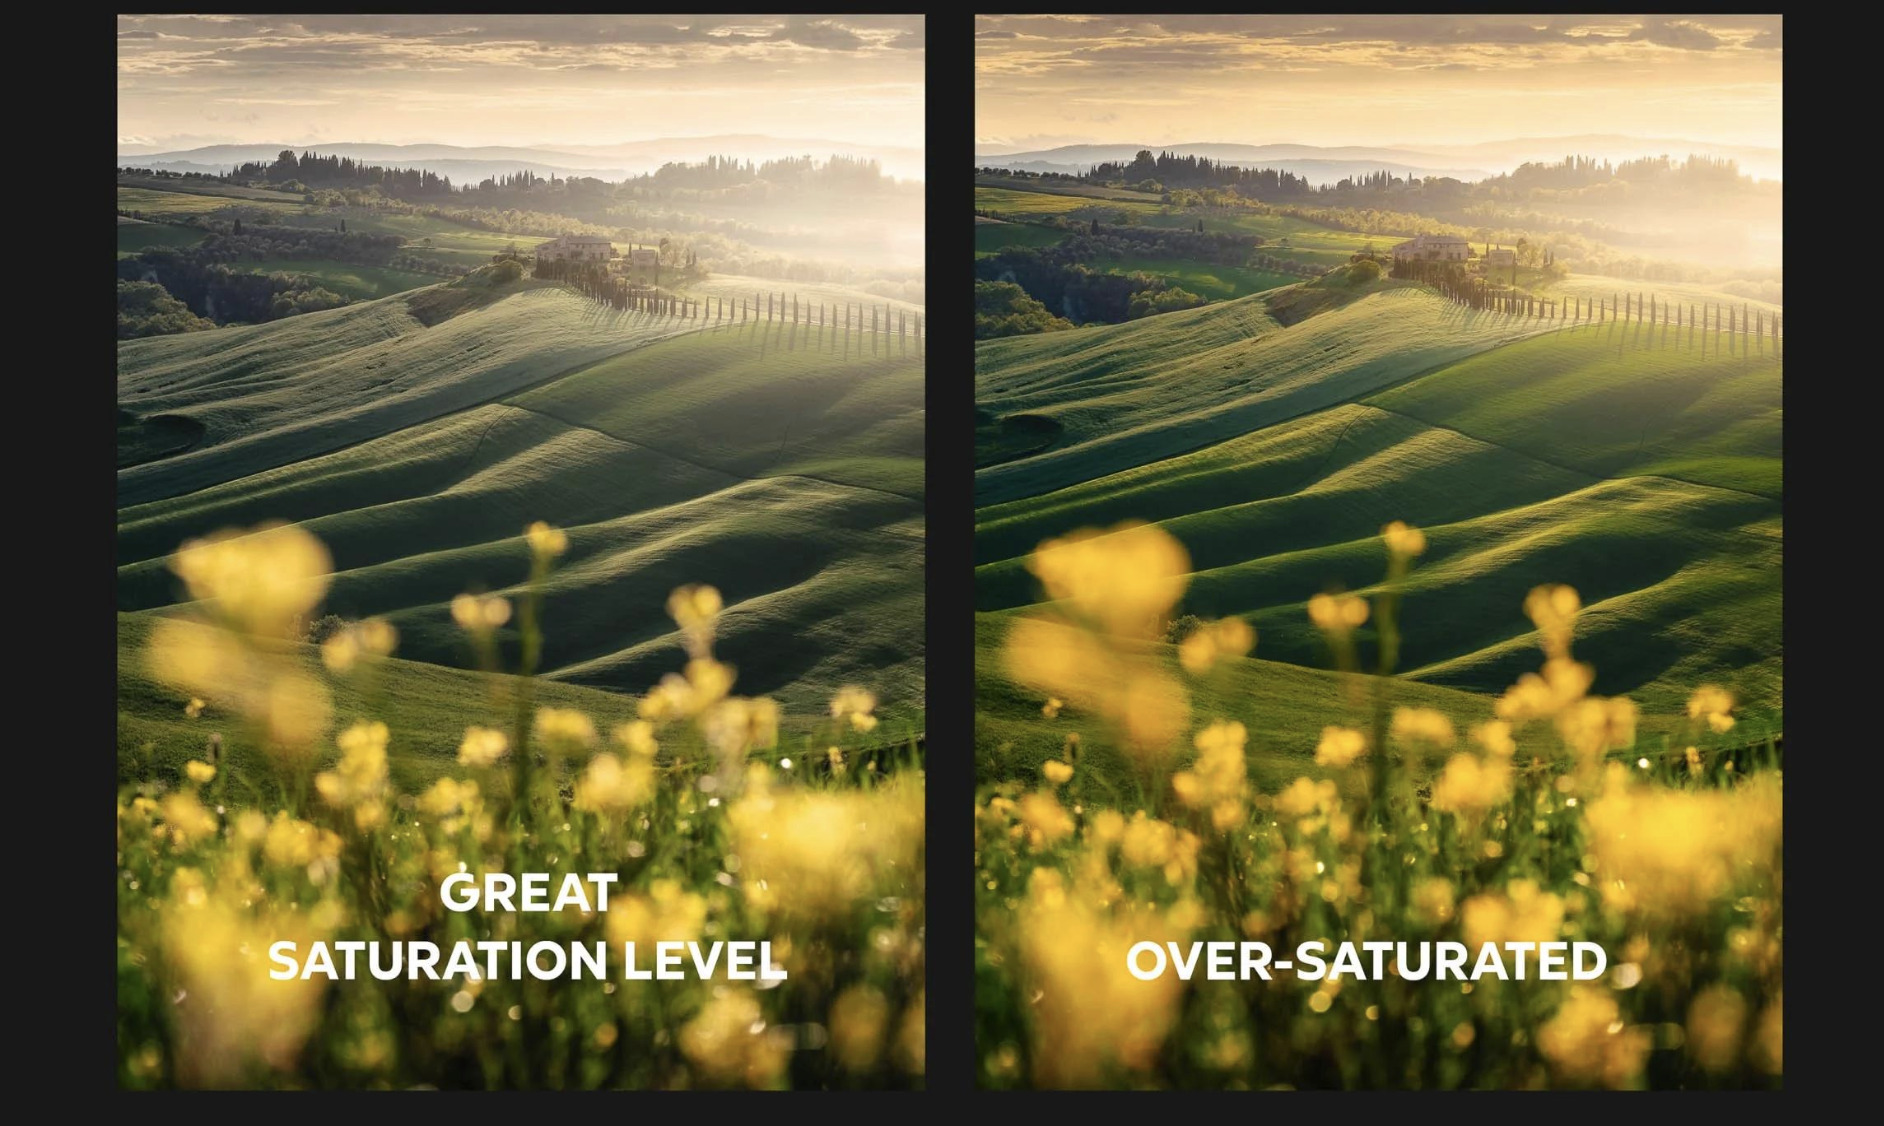
Edit to reveal, not to fake
This is where most food photos go wrong in the opposite direction. After the trouble of capturing the dish, people reach for the saturation slider and crank everything until the tomato glows nuclear red and the whole image looks like a fast-food advertisement from a parallel universe. Oversaturated, over-sharpened, artificially warm food photography is its own cliché, and it makes food look less appetising, not more, because we instinctively distrust colour that does not look real.
The better approach, and the one at the heart of how good editing works, is to enhance what was genuinely there rather than invent something that wasn't. Gently lift the exposure if the shot is a touch dark. Correct the white balance so the whites read as white and the food's true colours come through, removing any leftover yellow cast from mixed light. Add a small amount of contrast and a careful touch of warmth to make it inviting. The goal is the food at its honest best — the way it looked when it made you hungry — not a hyper-real cartoon of it. Restraint reads as quality; excess reads as a menu photo no one believes.
The honest appetite
Put together, the quiet art of the food photo is really a single discipline practised in stages: find soft natural light, choose the angle the dish is asking for, style by subtraction, shoot at the peak moment, and edit to reveal rather than to fake. None of it requires a professional camera or a studio. It requires noticing the light, respecting the food, and resisting the urge to overdo it at every step.
The best food photographs make a simple promise and keep it: that the meal really did look this good, and that if you were sitting at this table, you would want to pick up a fork. That honesty — beautiful, but believable — is what separates a photo that makes someone hungry from one that just makes them scroll. Make the food look as good as it tasted, and no better. That is the whole art, and it is quieter than it looks.