There is a certain look that separates a snapshot from a photograph: the subject rendered in crisp focus while the background melts into a soft, creamy blur, drawing the eye exactly where the photographer wants it. Beginners often assume this effect requires expensive equipment or luck. It requires neither. It is depth of field, one of the most fundamental creative controls in photography, and once you understand what governs it, you can command it deliberately — sharpening a whole landscape or isolating a single subject from its surroundings entirely at will. This is a working guide to what depth of field is, what controls it, and how to bend it to your intentions.
What depth of field actually means
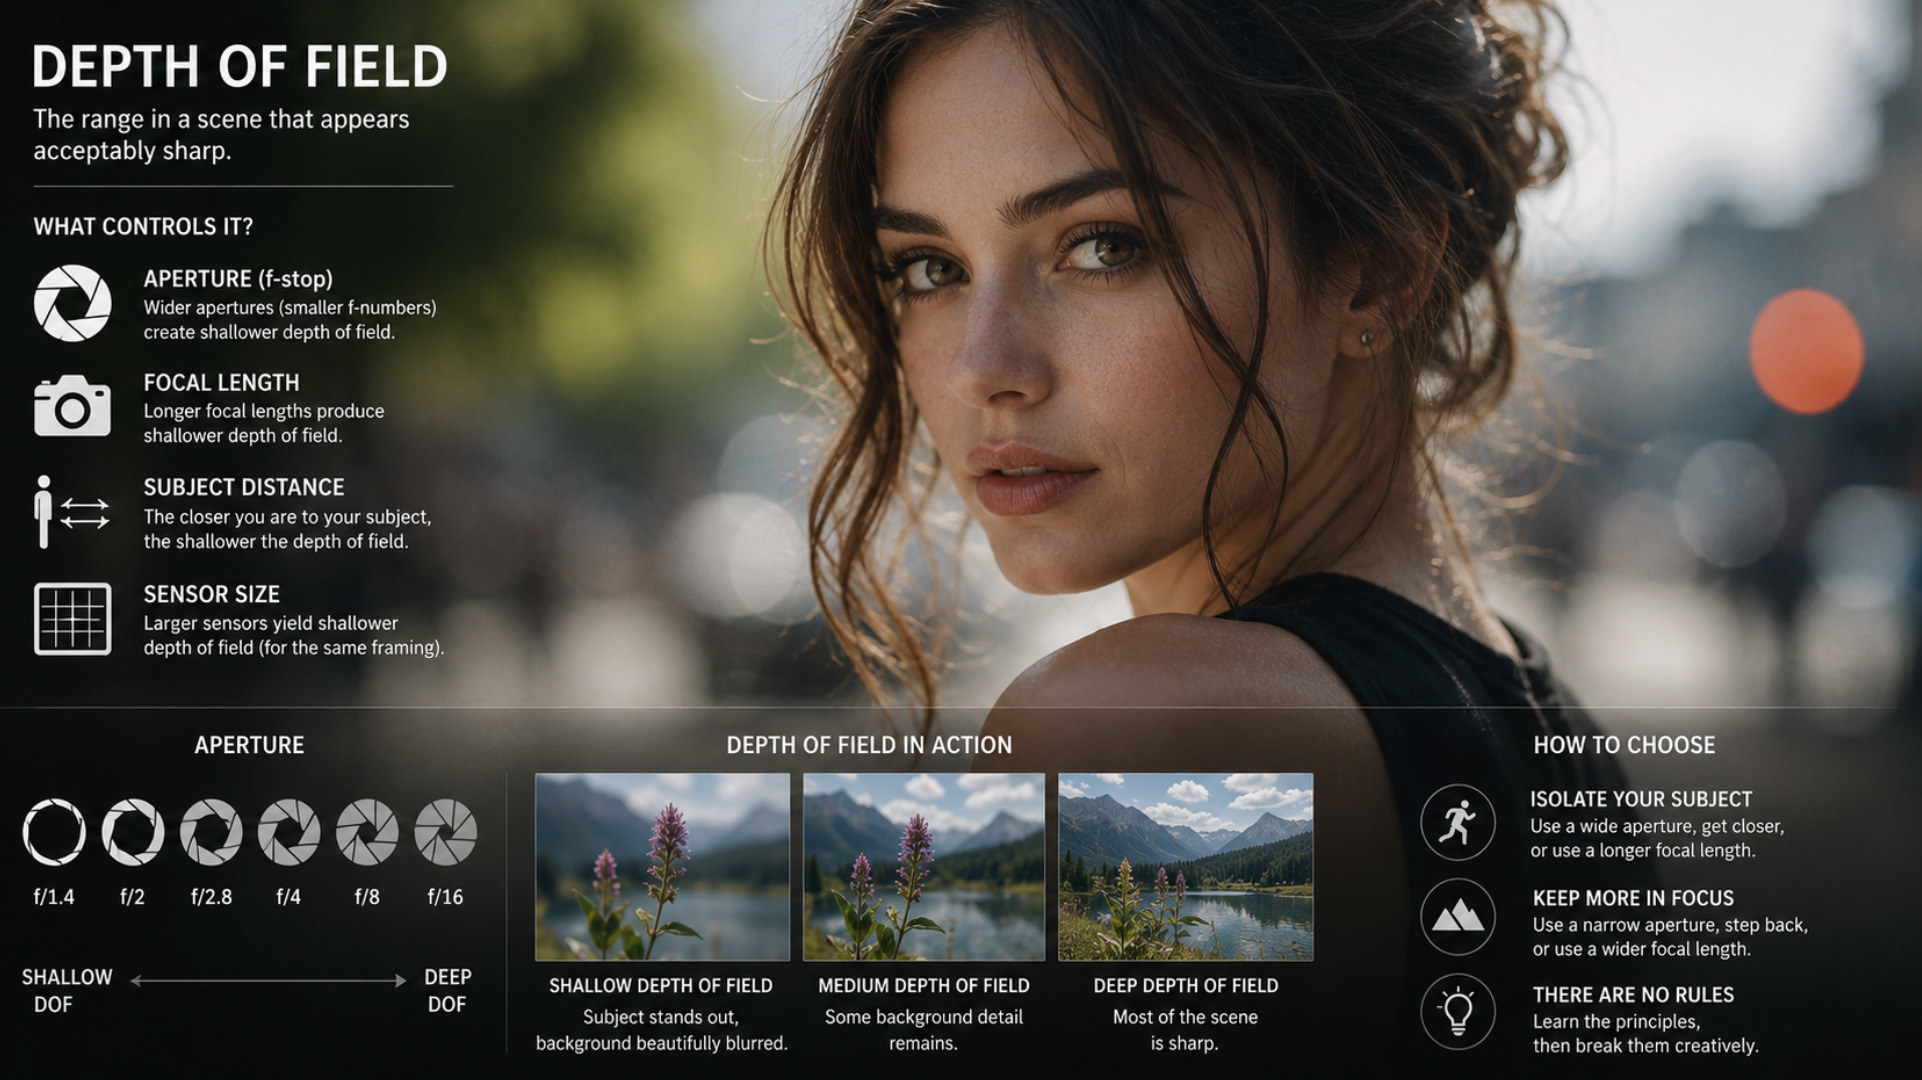
Depth of field is simply the amount of a photograph that appears acceptably sharp, from front to back. In any image, there is a zone of sharpness, and everything outside that zone falls off into blur. A photograph with a shallow depth of field has a very thin zone of sharpness — perhaps only the subject's eyes are crisp while everything in front of and behind them softens. A photograph with a deep depth of field has a broad zone, keeping everything from the foreground to the distant horizon in focus at once.
Neither is better than the other; each serves a purpose, and choosing between them is one of the photographer's core decisions. Shallow depth of field is the tool of isolation — it lifts a subject cleanly off its background, giving portraits and details that intimate, subject-first look. Deep depth of field is the tool of inclusion, keeping an entire scene sharp, which is why it belongs to sweeping landscapes and architecture where every plane matters. Understanding that you are always making this choice, whether consciously or not, is the beginning of controlling it. The blurred background is not a happy accident; it is a shallow depth of field, selected on purpose.
The three levers that control it
Depth of field is governed chiefly by three factors, and learning how each one pushes the zone of sharpness wider or thinner is what turns the effect from luck into craft. The most important is aperture — the size of the opening that lets light into the lens. A wide aperture produces a shallow depth of field, with that thin slice of sharpness and heavy background blur; a narrow aperture produces a deep depth of field, bringing far more of the scene into focus. Aperture is the primary creative lever, and mastering it is most of the battle.
The other two levers compound the effect. Distance to your subject matters enormously: the closer you are to what you are focusing on, the shallower the depth of field becomes, which is why close-up shots blur their backgrounds so dramatically and distant scenes tend to hold more in focus. And the focal length of your lens plays a role too, with longer lenses tending to render a shallower depth of field and compress the background, while wider lenses keep more sharp. In practice these three work together — a wide aperture, up close, with a longer lens produces the most extreme background blur, while the opposite combination keeps everything crisp. Knowing how to combine them is how you dial the look in precisely rather than hoping for it.
Using it with intention
The point of understanding depth of field is not technical mastery for its own sake but the ability to serve the photograph you actually want to make. The essential question to ask before pressing the shutter is what the image is about — what the viewer's eye should land on — and to let that answer set your depth of field. If the picture is about a single subject, a shallow depth of field that dissolves the background removes distraction and commands attention exactly where it belongs. If the picture is about a whole scene, a place, a sense of space, a deep depth of field that holds every element sharp lets the viewer explore it all.
This is where depth of field becomes a genuine storytelling tool rather than a mere setting. Blur is not just an aesthetic prettiness; it is a way of directing attention, of saying this matters and that does not through focus alone. A portrait with a soft background insists on the person; a landscape in total sharpness insists on the world. The control connects directly to the broader craft of guiding the eye that we discussed in the composition choices that quietly make a photo work — depth of field is composition performed with focus rather than framing. Choosing it deliberately, in service of your subject, is what elevates a technically fine image into an intentional one.
From accident to authorship
The difference between photographers who stumble into good images and those who make them reliably often comes down to exactly this kind of control. Depth of field is not a mysterious property of good cameras; it is a lever you can reach for on any shot, governed by understandable factors that you can adjust to produce the precise look you envision. Once you internalise how aperture, distance, and focal length shape the zone of sharpness, the beautiful blurred background stops being something that happens to you and becomes something you decide.
That shift — from accident to authorship — is the whole reward. You begin to see, before you shoot, how much of the frame you want sharp and how much you want dissolved, and you set your controls to make it so. The soft, subject-isolating look you admired in other people's photographs becomes simply one of the choices available to you, no more magical than framing or timing. Depth of field is a foundational language of photography, and speaking it fluently means every image becomes a deliberate statement about where the eye should go — which, in the end, is what photography is for. The same intentionality carries into the edit, where the mood is refined rather than manufactured, much as we described in working with golden hour and the light that flatters everything.
Frequently asked questions
What is depth of field in photography? Depth of field is the amount of a photograph that appears acceptably sharp, from front to back. A shallow depth of field keeps only a thin slice — perhaps just the subject — in focus while the rest blurs; a deep depth of field keeps most of the scene, from foreground to horizon, sharp at once.
How do I get a blurred background? By creating a shallow depth of field. Use a wide aperture, move closer to your subject, and favour a longer focal length — these three combined produce the most dramatic background blur. The wide aperture is the primary control; getting closer and using a longer lens intensify the effect.
When should I use deep versus shallow depth of field? Use shallow depth of field when the image is about a single subject, to isolate it from a distracting background and command attention — ideal for portraits and details. Use deep depth of field when the image is about a whole scene, keeping everything sharp — ideal for landscapes and architecture where every plane matters.